How to install ubuntu on raspberry pi: a complete tutorial
Содержание:
- Install Ubuntu 16.04 LTS
- Conclusion
- Booting into Ubuntu Classic Server 16.04
- Overclocking Your Raspberry Pi 4 in Ubuntu
- Prepare the SD Card
- Recommended Gear
- Raspberry Pi OS vs Ubuntu: First Bootif(typeof __ez_fad_position!=’undefined’){__ez_fad_position(‘div-gpt-ad-raspberrytips_com-leader-4-0’)};
- Using EFI Firmware and the regular Debian Installer
- Установка Ubuntu Server на Raspberry Pi
- Raspberry Pi community engagement
- WiFi
- Использование Ubuntu Core
- Raspberry Pi OS vs Ubuntu: Image & Compatibility
- Raspberry Pi Imager tutorials
- Raspberry Pi OS vs Ubuntu: Background
Install Ubuntu 16.04 LTS
Download Ubuntu for the Raspberry Pi 3 ARM Processor
You can download the zipped up image file from here – this is listed as “Ubuntu Classic Server 16.04 for the Raspberry Pi 3” on this page (shown below, highlighted in red).

Once you’ve downloaded this zipped file, you’ll need to extract it (using a tool such as 7-zip).
Format the SD Card
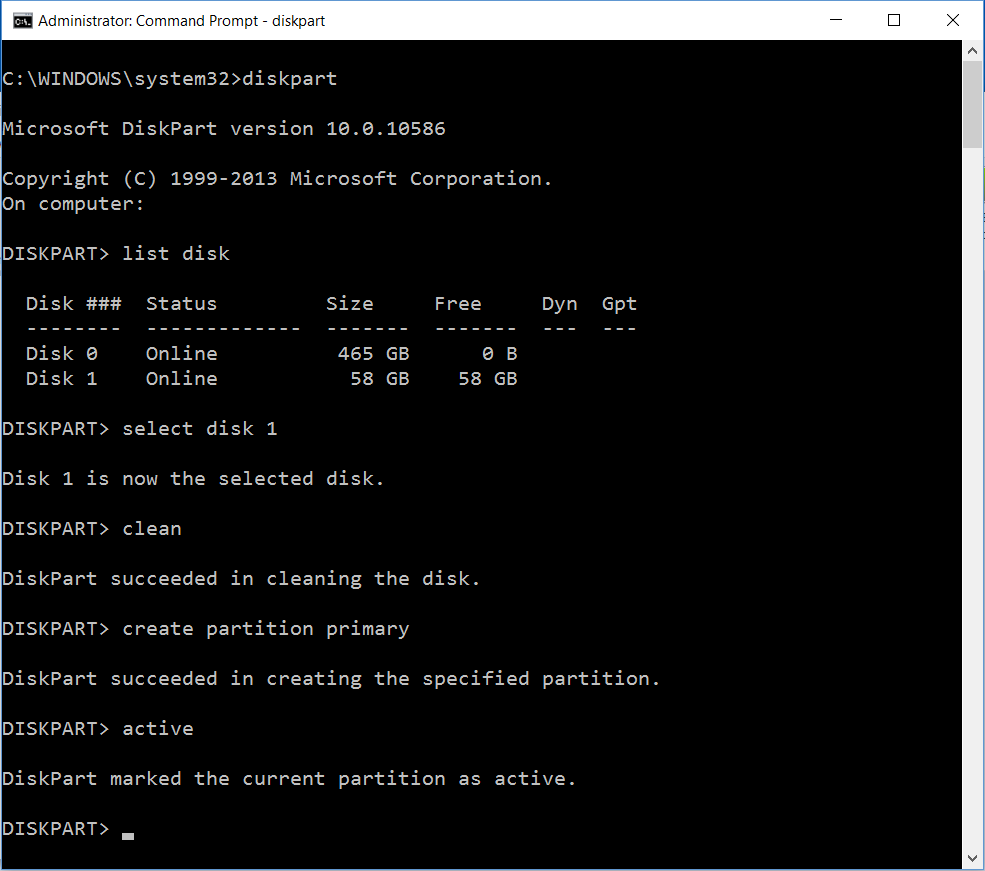
If you’ve a brand new card you might not need to format it, but if you’ve used your card for a previous installation, I think the easiest way to format a card is to use the diskpart tool which is shipped with Windows. I’ve previously blogged about how to do this at the link below:
The image below shows a summary of how I formatted my disk:
- First I call diskpart
- Then I list the disks (using list disk)
- Then I select the disk which is my SD card (using select disk 1, though your number might be different)
- Then I clean the disk (using clean
This sometimes fails with a permission error – I find that just calling clean again solves the problem
)
- Then I create a primary partition on the cleaned disk (using create partition primary)
- Finally I make this partition active (using active).
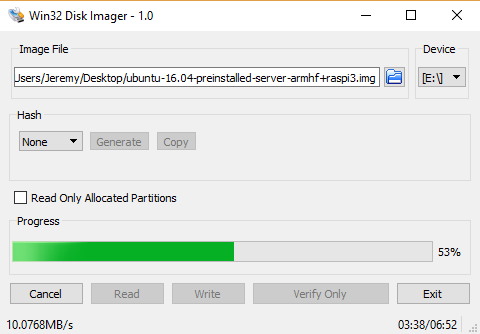
Write the Ubuntu image to the SD Card
Now that I have an un-zipped Ubuntu 16.04 image and a clean SD card, I need to flash this image to the card. I did this using a tool called “Win32DiskImager” which I downloaded from https://sourceforge.net/projects/win32diskimager/. There’s more information about this tool here: https://wiki.ubuntu.com/Win32DiskImager.
I browsed to the image file after opening “Win32 Disk Imager”, selected the drive letter associated with my SD card, and then I clicked on the “Write” button. It took my machine about 7 minutes to flash the image to my SD card.
Insert the SD card to the Raspberry Pi 3 and boot
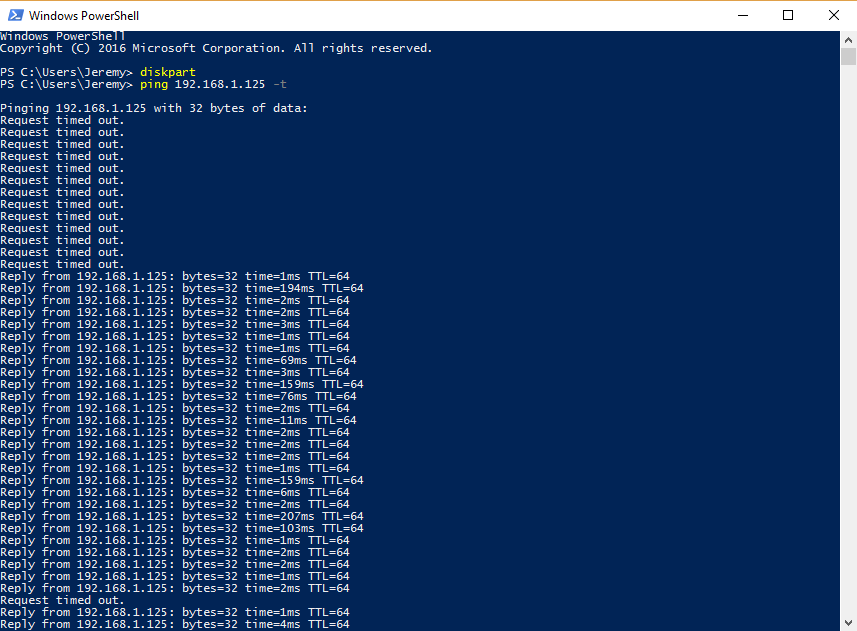
Now I insert the SD card into my Raspberry Pi 3, and connect the USB power supply. The easiest way to see what happens when you boot your Raspberry Pi 3 is to connect it to an HDMI monitor – I am lucky enough to have one of these monitor types.
However, I’ve also done this without a monitor – I happen to know that the wired IP address that my Raspberry Pi 3 always chooses is 192.168.1.125 – so if I insert the SD card into my Pi 3, and then switch it on, I know that if I run “ping 192.168.1.125 -t“, it’ll time out until the wired ethernet connects.
Connect to the Raspberry Pi 3 over ssh using PuTTY
I downloaded an installer for PuTTY from here – this allows me to SSH into my Raspberry Pi 3 from my Windows machine.
I find it helps to add the path to PuTTY to my machine path – I found the default path for the 64-bit installer to be “C:\Program Files\PuTTY“, which I then added to my machine’s path.
You can see your machine’s path from a PowerShell prompt using the command below:
Get-ChildItem -Path Env:Path | Select-Object -ExpandProperty Value
Once my path is updated, I’m able to type “putty” at a command prompt and a window opens like the one below:
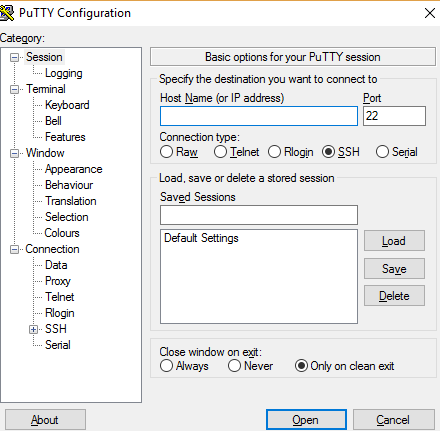
My Raspberry Pi 3 has IP address 192.168.1.125, and I typed this into the “Host Name” box in the window above. When I clicked on the “Open” button, the system shows me a window like the one below.
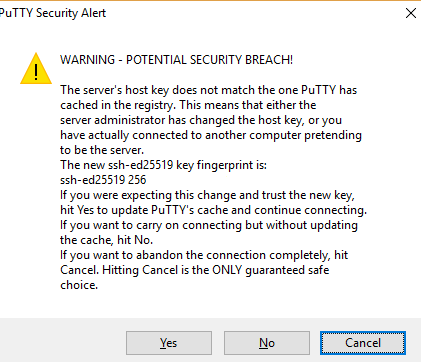
Since I was expecting this, I clicked on Yes, and a window opens asking for a username and password. The first time you log in, the username is ubuntu and the password is ubuntu. However, the first time you log in, you’ll be asked to change this password.
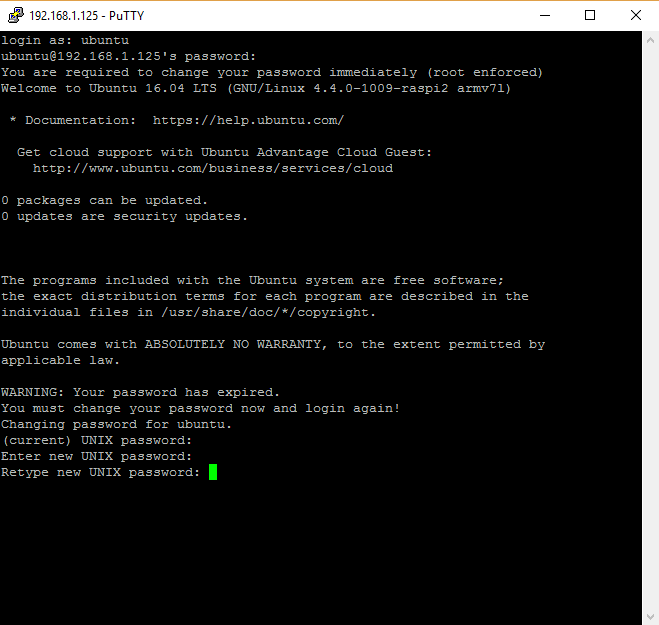
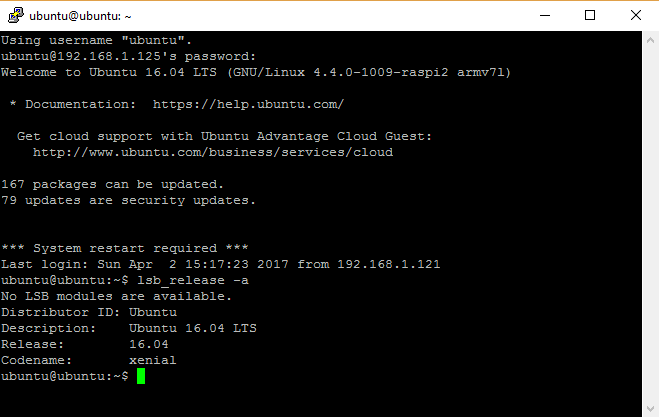
After I confirm the new password by typing it for a the second time, the PuTTY connection closes and I need to SSH in again – this time with the new password.
At this point Ubuntu 16.04 is installed onto the Raspberry Pi 3 and ready to be used – I can verify this by using the command below:
lsb_release -a
This prints distribution specific information, as shown below:
Conclusion
I’m very excited to see my favorite Linux distributions continue to evolve to the point where they are comparable in performance and stability to Raspbian. I’ve been testing extensively on Ubuntu Server 32 bit and 64 bit for my Raspberry Pi Minecraft Server project and not only is it on par with Raspbian but starting to do things so well it sometimes makes Raspbian feel a little dated.
If you have any questions or suggestions don’t hesitate to leave me a comment on the post or use my contact form to message me privately! I’m good about responding quickly and my articles are constantly revised to address questions or do something a better way that a reader pointed out.
Have fun!
Booting into Ubuntu Classic Server 16.04
With the assembly of Raspberry Pi 3 board and Official Raspberry Pi case, I then connected one end of the RJ45 cable to the RJ45 port on my Raspberry Pi 3 board and the other end of the cable to one of the switch port on my home router.
To facilitate the configuration of Ubuntu Classic Server 16.04, I connected my trusty mouse, keyboard, monitor to the USB and HDMI ports of my Raspberry Pi 3 board.
The default username to login Ubuntu Classic Server 16.04 is ubuntu and the password is ubuntu.
At the first login, the system will prompt for password change. I entered ubuntu as the current password and my favourite password twice to change the default password:
You are required to change your password immediately (root enforced)
(current) UNIX password:
Enter new UNIX password:
Retype new UNIX password:
passwd: password updated successfully
After I had changed the password, I supplied ubuntu as the username and my favourite password to the login prompt to continue with configuring my Ubuntu Classic Server 16.04 on my Raspberry Pi 3.
Overclocking Your Raspberry Pi 4 in Ubuntu
If you want to squeeze a little more performance out of your Raspberry Pi 4 in Ubuntu, you can overclock the Raspberry Pi 4. Just make sure that you have good cooling, preferably a fan such as the Pimoroni Fan Shim, and be ready to experiment.
To overclock in Ubuntu, you must edit the config.txt file on the boot partition. You can get to it by typing sudo nano /boot/firmware/config.txt at the command prompt.
Alternatively, if you can’t boot because you overclocked too much, you can get to the file by putting the microSD card in your PC or Mac, opening the root directory or the card and using your text editor to open it.
Once you have the config.txt open for editing, you’ll need to add the following lines to the bottom if they aren’t already there:
over_voltage=4
arm_freq=2000
gpu_freq=650
Config.txt screen (Image credit: Tom’s Hardware)
These values should work on most, if not all units, provided that you have a decent power source and cooling. It’s possible that you could turn the frequency up a little higher, as we’ve been able to overclock a Raspberry Pi 4 up to 2,147 MHz in Raspbian with a 750 MHz GPU and overvolt of 6, but we were not able to achieve speeds higher than that in Ubuntu.
If you try higher values, your system may not boot or it may become unstable, so proceed at your own risk. If your system fails to boot after you’ve increased the values, you can always put the microSD card into your PC and edit config.txt from there to lower them.
Prepare the SD Card
- Insert the microSD card into your computer
- Install the Raspberry Pi Imager tool for your operating system. You can do this with the following links:
- Raspberry Pi Imager for Ubuntu
- Raspberry Pi Imager for Windows
- Raspberry Pi Imager for macOS
Or, if you are on Ubuntu, you can run:
- Once this is done, start the Imager and open the “CHOOSE OS” menu.

- Scroll down the menu click “Other general-purpose OS”.

- Here you can select Ubuntu and see a list of download options. For this tutorial we recommend you select the Ubuntu Core 18 32-bit armhf download. As indicated in the imager this will work for the Raspberry Pi 2,3, 3+ and any of the 4’s.
- Select the image and open the “SD Card” menu. Select the microSD card you have inserted.
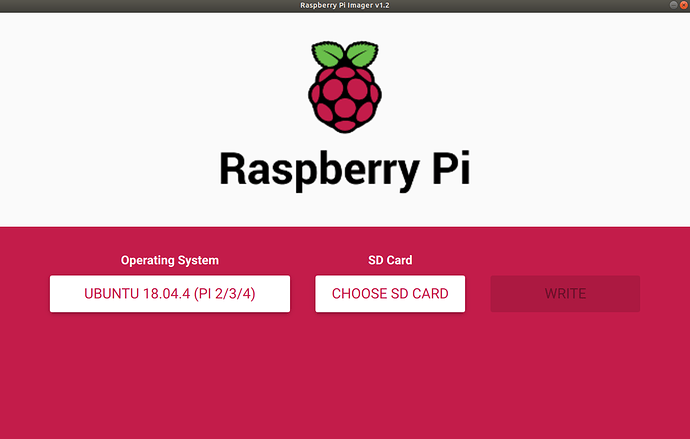
- Finally, click “WRITE” and wait for the magic to happen… (This magic might take a few minutes)
Recommended Gear
I highly recommend upgrading to a solid state setup. The performance gains are gigantic. It’s now less than 30 bucks to take your Pi solid state. This is the best performance upgrade you can possibly get for a Pi.
With the new Raspberry Pi 4 it’s even more beneficial to use USB storage since a USB 3.0 bus was finally added in the Pi 4 letting it take full advantage of solid state drives. This is the setup I am currently using:
Raspberry Pi 4
The Raspberry Pi 4 is available in different memory configurations all the way up to 8 GB. It’s about the size of a credit card and uses an extremely low amount of power making it ideal for all sorts of projects and ideas!
Links: AliExpress.com*, Amazon.ae*, Amazon.ca*, Amazon.com*, Amazon.com.au*, Amazon.com.mx*, Amazon*.co.jp*, Amazon.co.uk*, Amazon.de*, Amazon.es*, Amazon.fr*, Amazon.in*, Amazon.it*, Amazon.nl*, Amazon.pl*, Amazon.sa*, Amazon.se*, Amazon.sg*
Raspberry Pi 400 Kit*
The Raspberry Pi 400 kit includes everything you need for a full Pi 400 desktop build. The Pi 400 is the fastest Raspberry Pi ever released and comes in the form factor of a keyboard!
Links: AliExpress.com*, Amazon.ae*, Amazon.ca*, Amazon.com*, Amazon.com.au*, Amazon.com.mx*, Amazon.co.jp*, Amazon.co.uk*, Amazon.de*, Amazon.es*, Amazon.fr*, Amazon.in*, Amazon.it*, Amazon.nl*, Amazon.pl*, Amazon.sa*, Amazon.se*, Amazon.sg*
Kingston A400 2.5″ SATA SSD
The Kingston A400 has been a great drive to use with the Pi for years. It’s reliable, widely available around the world, has low power requirements and performs very well. It’s also very affordable. This drive has been benchmarked over 1000 times at pibenchmarks.com and is the #1 most popular SSD among the Pi community!
Links: AliExpress.com*, Amazon.ae*, Amazon.ca*, Amazon.com*, Amazon.com.au*, Amaz*o*n.com.mx*, Amazon.co.jp*, Amazon.co.uk*, Amazon.de*, Amazon.es*, Amazon.fr*, Amazon.in*, Amazon.it*, Amazon.nl*, Amazon.pl*, Amazon.sa*, Amazon.se*, Amazon.sg*
StarTech 2.5″ SATA to USB 3.0/3.1 Adapter
Both the USB 3.0 and USB 3.1 variants of the StarTech 2.5″ SATA adapter work well with the Pi 4. I’ve used the 3.0 variant with my Pi 4 since launch and it has always worked well. I later bought the 3.1 variant and had the same positive experience. These two adapter variants are my go to adapters for all my Pi related projects that need a fast and easy 2.5″ SATA SSD!
Links: Amazon.ae*, Amazon.ca*, Amazon.com*, Amazon.com.au*, Amazon.com.mx*, Amazon.co.jp*, Amazon.co.uk*, Amazon.de*, Amazon.es*, Amazon.fr*, Amazon.in*, Amazon.it*, Amazon.nl*, Amazon.pl*, Amazon.sa*, Amazon.se*, Amazon.sg*
Or for a compact setup:
SanDisk Extreme Pro SSD
The SanDisk Extreme Pro USB SSD is a true solid state drive. This is different than a typical “flash drive” which uses extremely cheap memory and has very low random I/O performance/throughput compared to a real solid state drive. I’ve used both the USB 3.1 and USB 3.2 variants with the Pi successfully and they benchmark very well!
Links: AliExpress.com*, Amazon.ae*, Amazon.ca*, Amazon.com*, Amazon.com.au*, Amazon.com.mx*, Amazon.co.jp*, Amazon.co.uk*, Amazon.de*, Amazon.es*, Amazon.fr*, Amazon.in,* Amazon.it*, Amazon.nl*, Amazon.pl*, Amazon.sa*, Amazon.se*, Amazon.sg*
SD Card Setup:
SanDisk Extreme A1
The SanDisk Extreme A1-A2 SD card has the best scoring SD card on pibenchmarks.com for years and is second in popularity only to the SanDisk Ultra (often included in combo kits). The application class (A1) means random I/O speeds (very important when running an OS) have to meet a higher standard. There’s no benefit on the Pi for A2 right now so get whichever is cheaper/available.
Links: AliExpress.com*, Amazon.ae*, Amazon.ca*, Amazon.com*, Amazon.com.au*, Amazon.com.mx*, Amazon.co.jp*, Amazon.co.uk*, Amazon.de*, Amazon.es*, Amazon.fr*, Amazon.in*, Amazon.it*, Amazon.nl*, Amazon.pl*, Amazon.sa*, Amazon.se*, Amazon.sg*
These storage choices are ones that all scored highly on the end-user submitted Raspberry Pi Storage Benchmarks and will give you outstanding I/O performance on the Raspberry Pi. I also personally own all of them and recommend them knowing they are compatible and perform well on the Pi.
Raspberry Pi OS vs Ubuntu: First Bootif(typeof __ez_fad_position!=’undefined’){__ez_fad_position(‘div-gpt-ad-raspberrytips_com-leader-4-0’)};
Raspberry Pi OS
Raspberry Pi OS will start directly with a default session. The default user is “pi”. On the first boot, you’ll get a welcome wizard to help you with the first configuration steps: language, password, display, Wi-Fi and updates.
This tool is easy to use and pretty quick to follow, you can even skip everything if you want to start immediately and configure the system later. As a French guy, I would love to see a way to configure the keyboard layout in this wizard, but it’s not possible (except for US/UK), you have to do it after (even if it asks to set a password in the next step…).
Ubuntu
Ubuntu also has a welcome wizard that will show up on the first boot. You can configure the language, keyboard layout, and timezone, but you’ll also need to create the first user. It’s an additional step compared to Raspberry Pi OS, but it’s a good thing in terms of security (it’s better than using the same user/password for anyone).
The main problem is that this wizard will take a long time. It seems like it needs your answers to install your system. It will set up your language and keyboard layout, but also configure the hardware, things about USB. It’s the same thing as on a desktop computer for those who are used to it.
Updates are mandatory, so you have to wait for download and installation. Once again, not a bad thing if you have a good Internet connection, but a bit annoying when you are not that lucky :).
Overall, expect about 10 to 15 minutes for the whole process. Once done, the Raspberry Pi will reboot and display the complete interface. You have another wizard available to configure your online accounts, privacy, etc. But it’s not mandatory this time.
Master your Raspberry Pi in 30 daysSale: 10% off today.Download the eBook.Uncover the secrets of the Raspberry Pi in a 30 days challenge.Learn useful Linux skills and practice multiples projects.Get it Now!
Summary
As a whole, Raspberry Pi OS is faster to start because everything is already pre-installed on the SD card. The Ubuntu distribution needs a bit more time but has safety steps included, which is great. I’ll still give it a penalty for speed, but if you are certain to use Ubuntu as your main operating system, spending 15 minutes on the first boot is not a big deal.
I don’t give the highest score to both because I think we can do better with this. Raspberry Pi OS still uses a default username and password, and neither lets you configure the display in details (resolution, dual-screen, etc.). For beginners especially, still having to go in the settings after this first start is a bit of a shame.
| Raspberry Pi OS | Ubuntu | |
|---|---|---|
| First boot experience | 4.5/5 | 3.5/5 |
Using EFI Firmware and the regular Debian Installer
The Pi Firmware Task Force works on an SBBR-compliant (UEFI+ACPI) AArch64 firmware for the Raspberry Pi 4 which allows the normal, vanilla Debian aarch64 installer to run and install a working Debian bullseye on the Raspberry PI.
Instructions to doing so are here and here.
The installed system does not use the Device Tree approach that is common on the ARM platforms to detect and enumerate hardware. Instead, vanilla ACPI is used like this is the case on the normal PC/Intel architecture. This might cause Raspberry Pi device drivers to support ACPI which some of today’s device drivers (2021-06) don’t do. If hardware that works on a device tree system doesn’t work on an EFI/ACPI system, it might be possible that the device driver doesn’t support ACPI yet. Unfortunately, the most prominent driver suffering from this lack of ACPI support is vc4, making this installation method unsuitable for systems that need a graphical console.
2021-06, the EFI firmware limits the usable memory amount to 3 GB to cater for a hardware issue that has been worked around in the recent kernels that Debian ships in bullseye and buster-backports. The option to enable the full memory is accessible in the EFI Setup at system startup: Device Manager → Raspberry Pi Configuration → Advanced Configuration and set Limit RAM to 3 GB to <Disabled>. This setting is safe for those kernels.
Установка Ubuntu Server на Raspberry Pi
- libraspberrypi-bin — набор утилит VideoCore, например, raspistill;
- libraspberrypi-bin-nonfree — утилиты VideoCore с закрытым исходным кодом;
- xserver-xorg-video-fbturbo — более быстрый драйвер Xorg;
Для установки этих пакетов вам необходимо добавить PPA репозиторий:
Но поскольку это серверная система, вам придется подключиться по SSH чтобы выполнить все настройки. Если вам все же недостаточно доступа из командной строки, можно установить окружение рабочего стола, например, XFCE:
Или LXDE:
Можно даже установить Kubuntu, но для нее желательно отключить все эффекты рабочего стола. К сожалению, пока вы не сможете запустить на Raspberry Pi оболочку Gnome 3, поскольку там используется 3D композитинг.
Raspberry Pi community engagement
With all of the above it’s no surprise, but still humbling, that there was a lot of talk online. We engaged in some fun and interesting discussions, some incredibly useful feedback and some less than helpful rants (but it wouldn’t be the internet without that).
Starting this month and continuing into the new year we are also going to turn attention to support for the community. Earlier this month one of our Field Engineers, one Taiten Peng, gave a presentation to a group of Raspberry Pi enthusiasts in Taipei about Ubuntu on Raspberry Pi. Let’s call it a test drive. To get the word out and to help people get cracking with. We want to give some talks, do some presentations, maybe some workshops to Pi communities who might be interested. Virtually for a while of course.

WiFi
Since 18.04.2 the linux-firmware and linux-firmware-raspi2 packages now contain the necessary files for the built-in WiFi on the Pi 3B, 3B+, and 4B. However, if for some reason you want the latest and greatest files:
mkdir wifi-firmware
cd wifi-firmware
# Pi 3B
wget https://github.com/RPi-Distro/firmware-nonfree/raw/master/brcm/brcmfmac43430-sdio.bin
wget https://github.com/RPi-Distro/firmware-nonfree/raw/master/brcm/brcmfmac43430-sdio.clm_blob
wget https://github.com/RPi-Distro/firmware-nonfree/raw/master/brcm/brcmfmac43430-sdio.txt
# Pi 3B+ and 4
wget https://github.com/RPi-Distro/firmware-nonfree/raw/master/brcm/brcmfmac43455-sdio.bin
wget https://github.com/RPi-Distro/firmware-nonfree/raw/master/brcm/brcmfmac43455-sdio.clm_blob
wget https://github.com/RPi-Distro/firmware-nonfree/raw/master/brcm/brcmfmac43455-sdio.txt
sudo cp *sdio* /lib/firmware/brcm/
cd ..
Reboot the machine.
Use dpkg-divert to stop these files being overwritten on package updates.
Использование Ubuntu Core
После начальной настройки Ubuntu Core загрузит чистый сеанс Ubuntu на основе терминала. Войдите в сеанс мгновенного ядра Ubuntu на Raspberry Pi через терминал SSH на удаленном ПК. В качестве альтернативы можно использовать простой терминальный сеанс прямо с Pi.
Чтобы войти в систему, замените X и Y информацией SSH, которую Ubuntu Core напечатал на экране во время процесса начальной настройки.
ssh
Имейте в виду, что ядро Ubuntu не использует Apt. Чтобы установить программное обеспечение, вам необходимо взаимодействовать с пакетами snap.
Хотите превратить свой Pi в сервер NextCloud? Пытаться:
sudo snap install nextcloud
Заинтересованы в запуске Docker? Делать:
sudo snap install docker
Существует множество различных Snaps серверного уровня, которые можно легко запустить на Pi, что делает его идеальным для дешевого сервера Linux.
Примечание: пожалуйста, поймите, что Ubuntu Core не для традиционных вычислений, и если вы ожидаете, что у вас будет традиционный рабочий стол Ubuntu, лучше всего установить Ubuntu Mate для Raspberry Pi. Он обеспечивает традиционный интерфейс Linux на базе ARM для Pi 2 и Pi 3.
Raspberry Pi OS vs Ubuntu: Image & Compatibility
Raspberry Pi OS has been around since the beginning of the Raspberry Pi computer (in 2012). Its first version was released almost at the same time as the first Raspberry Pi model, is highly optimized for Raspberry Pi, and there’s generally a new version of RPI OS released with each new model to assure maximum compatibility.
Ubuntu has had an official release for Raspberry Pi for only a few years and still has major issues to fix in 2020 versions (no Wi-Fi support, no desktop version, etc.). In this article, I’ll test the 21.04 version and see how it goes. At least they now have a desktop image available, and it supports a 64-bit CPU, which is not yet the case for Raspberry Pi OS at the time of writing.
Raspberry Pi OS has three versions available for download:
- Raspberry Pi OS with desktop and recommended software
- Raspberry Pi OS with desktop
- Raspberry Pi OS Lite
As the names suggest, the Lite version is a minimal operating system without an interface. Then there is a version with a GUI and the other has many applications so you can start using it directly.
Ubuntu has two versions available for Raspberry Pi:
- Ubuntu Server
- Ubuntu Desktop
The first one is the equivalent of Raspberry Pi OS Lite, with a minimal system (command-line only), and the second one has a desktop interface.
In this article, I’ll compare “Raspberry Pi OS with desktop and recommended software” to “Ubuntu Desktop”. Both images are almost the same size once extracted, so it doesn’t make a difference if you have a slow Internet connection. Ubuntu just uses a better compression, so the total download size is smaller, but I don’t think you’ll choose your system on this criterion only :).
I’m using a Raspberry Pi 4 and Ubuntu can be used on it, so no major issues in terms of compatibility here. Just take note that the Ubuntu Desktop image can only run on a 64-bit CPU, so older models are not compatible (unlike Raspberry Pi OS).
It shouldn’t be a big concern as you probably won’t use a Raspberry Pi Zero for desktop usage, but just to take note of this. Also, minor compatibility issues on Ubuntu are still expected, that’s why I can’t give a better score to this distribution:
| Raspberry Pi OS | Ubuntu | |
|---|---|---|
| Raspberry Pi compatibility | 5/5 | 3/5 |
Note: the compatibility criteria is particularly important if you intend to use GPIO pins and HATs with your Raspberry Pi. I don't write about this as it's generally not the case for desktop usage, but keep this in mind when doing your final choice: Raspberry Pi OS will always be more compatible than any other distribution.
Raspberry Pi Imager tutorials
Thomas Bille, from the Ubuntu web development team, recently posted a blog about a change we have made to how and where tutorials can be found and created. In this new place, you will find a growing number of tutorials that use a Raspberry Pi running Ubuntu. You will also find that each of these tutorials has been updated to use the Raspberry Pi imager.
The idea is to make starting with a Raspberry Pi on Ubuntu as frictionless as possible. We have a tutorial to walk you through the simple, and a tutorial to get you for your Raspberry Pi project.
As time goes on more of these tutorials will start cropping up. Please leave any comments or questions you have on in the new tutorial section of discourse, where they are written. We appreciate any constructive feedback you have.

Raspberry Pi OS vs Ubuntu: Background
Before anything else, let’s do a quick reminder: Raspberry Pi OS and Ubuntu are both based on Debian, which is one of the most popular distributions in the world. Debian is known for stability and simplicity.
As Raspberry Pi OS and Ubuntu are both based on Debian, you’ll find many similarities within the base system (for example, they both use APT as the package manager). But in this article, we’ll focus on the user experience as a desktop replacement.By the way, it’s also possible to directly install Debian on your Raspberry Pi (click on the link to learn more about it).
Raspberry Pi OS has been created by the Raspberry Pi Foundation to give a solid distribution for its tiny computer. As the main goal was to deliver it in school, we can expect it to be easy to use and highly compatible, but maybe too programming-oriented. We’ll see that in a minute.
Ubuntu has an opposite trajectory, as it’s pretty new on Raspberry Pi (with a stable version at least). They have had great success on standard computers, but their version for the Raspberry Pi is a recent side-project. We’ll see if they succeeded in keeping the benefits of their system for the Raspberry Pi. Compatibility and performances will probably be a challenge, but the overall user experience should be better if they succeed with this.
I won’t give a score in this first section, but understand that, in theory, Raspberry Pi OS is the king here, and Ubuntu is the challenger we’ll evaluate. I have done a quick survey on YouTube, it confirms my impression, but we’ll see how it goes: